> ## Documentation Index
> Fetch the complete documentation index at: https://agents.nanonets.com/docs/llms.txt
> Use this file to discover all available pages before exploring further.
# Set up an agent
> Create an agent, describe its job, add steps and tools, and choose when it should run.
An agent is easiest to build when you start with one clear business process.
For example: "Review incoming invoices, extract the key fields, check the vendor, and ask for approval if the total is above \$10,000."
## Create the agent
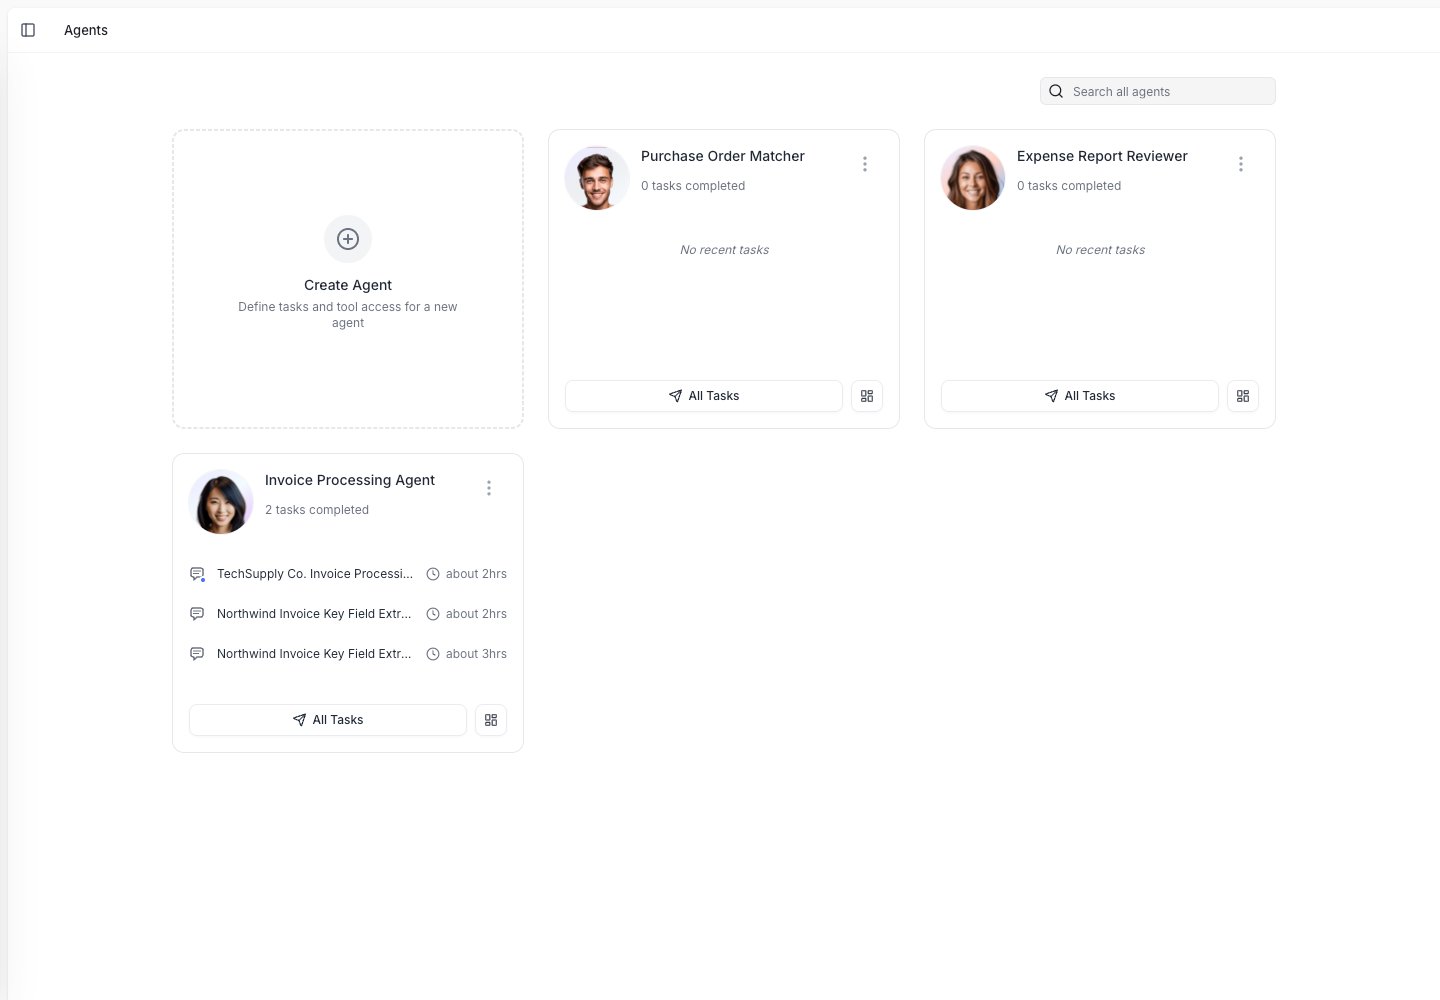
Go to **Agents** from the sidebar.
Choose **Create Agent**. Nanonets creates a new agent and opens the setup screen.
Enter a short name that describes the work, such as **Invoice Processing Agent**.
 ## The Configure screen
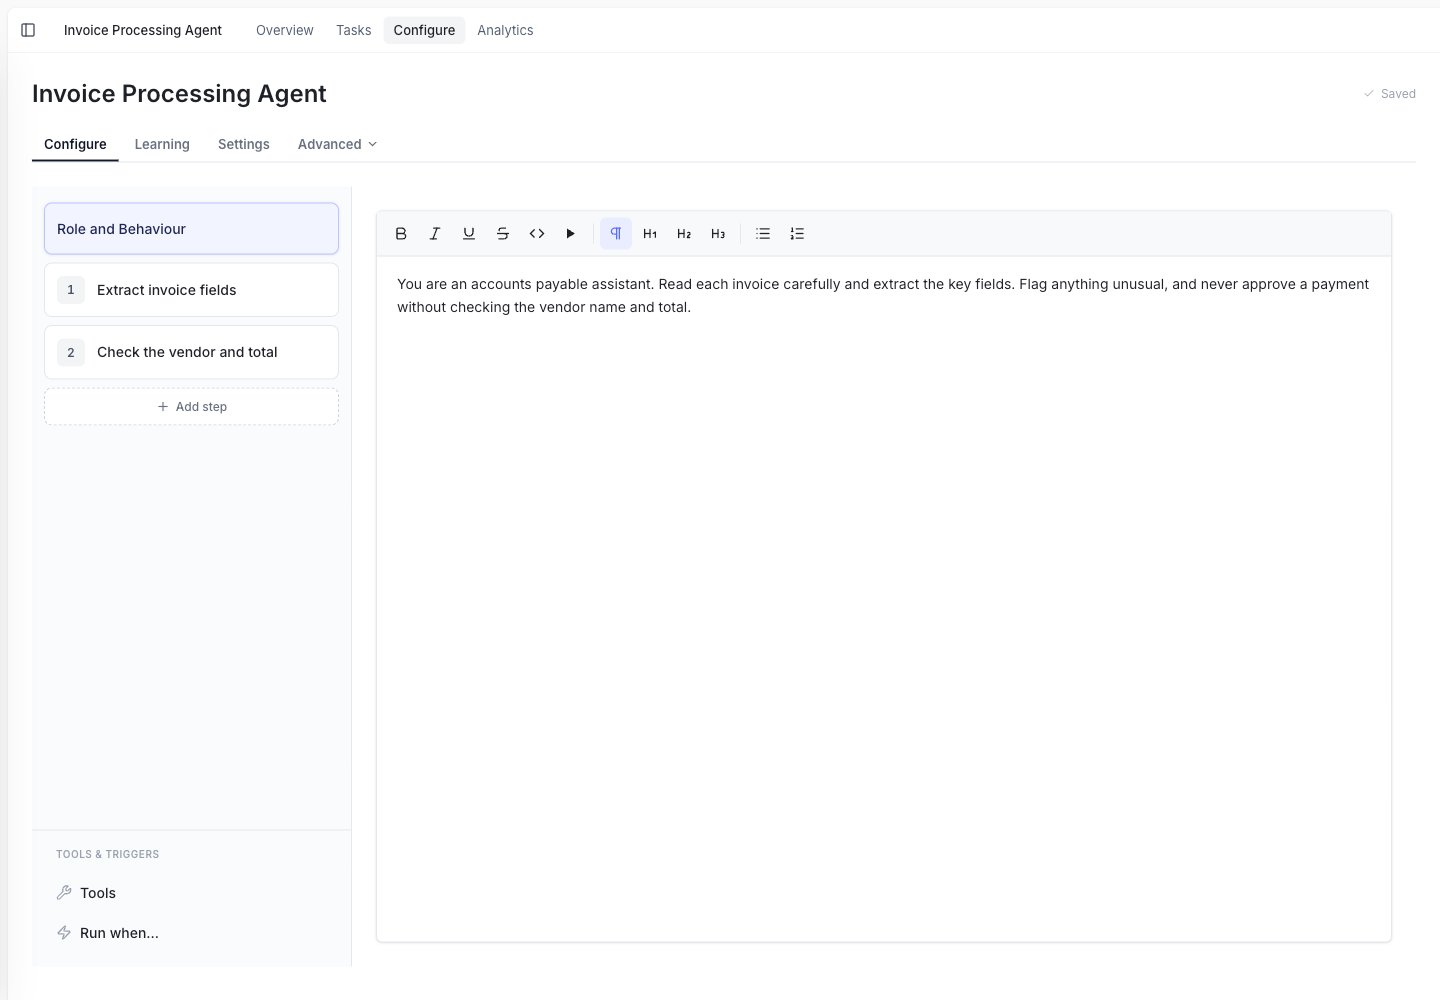
The Configure screen shows the parts of your agent on the left: **Role and Behaviour** and your **Steps**, with **Tools** and **Run when** below. Select any item to edit its details on the right.
## Add role and behaviour
**Role and Behaviour** describes who the agent is and the core process it follows: the job itself. Keep it focused on that; preferences, guardrails, and exceptions are better added as [rules](/docs/guide/rules).
Write it like you are explaining the job to a new teammate.
Good examples:
* "You are an accounts payable assistant who reviews vendor invoices."
* "Read each invoice carefully and extract the fields the finance team needs."
* "If something looks wrong or a field is missing, flag it instead of guessing."
## The Configure screen
The Configure screen shows the parts of your agent on the left: **Role and Behaviour** and your **Steps**, with **Tools** and **Run when** below. Select any item to edit its details on the right.
## Add role and behaviour
**Role and Behaviour** describes who the agent is and the core process it follows: the job itself. Keep it focused on that; preferences, guardrails, and exceptions are better added as [rules](/docs/guide/rules).
Write it like you are explaining the job to a new teammate.
Good examples:
* "You are an accounts payable assistant who reviews vendor invoices."
* "Read each invoice carefully and extract the fields the finance team needs."
* "If something looks wrong or a field is missing, flag it instead of guessing."
 ## Add steps
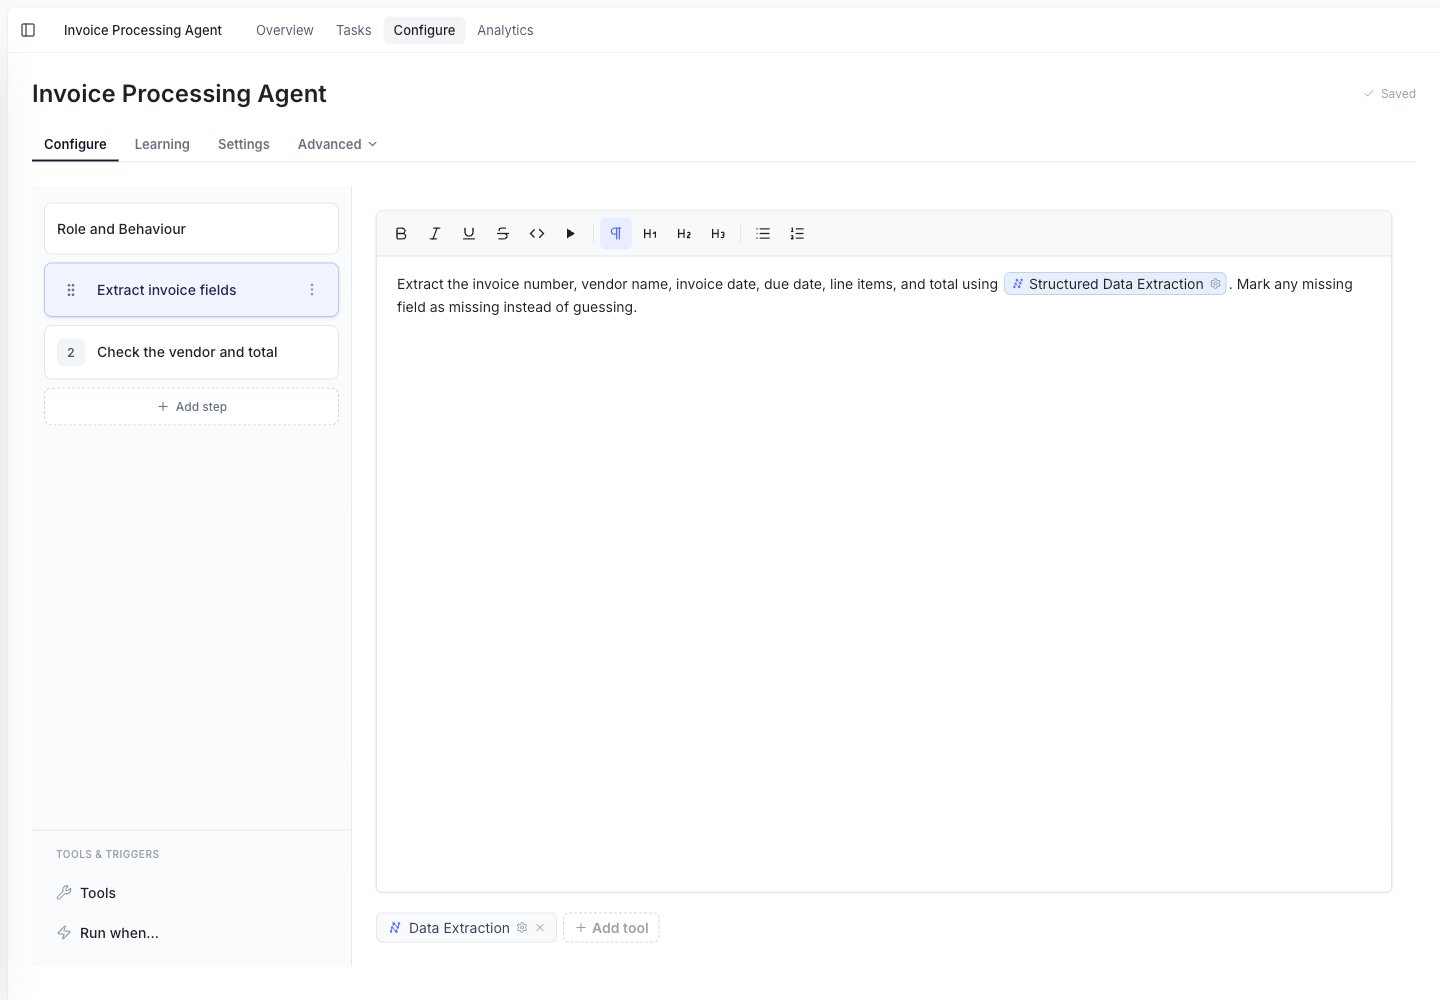
Steps break the work into smaller parts. This helps the agent follow the same process each time.
For an invoice agent, steps might be:
1. Read the invoice.
2. Extract invoice data.
3. Look up the vendor.
4. Ask for approval if needed.
5. Send the result to a spreadsheet.
## Add steps
Steps break the work into smaller parts. This helps the agent follow the same process each time.
For an invoice agent, steps might be:
1. Read the invoice.
2. Extract invoice data.
3. Look up the vendor.
4. Ask for approval if needed.
5. Send the result to a spreadsheet.
 ## Add tools
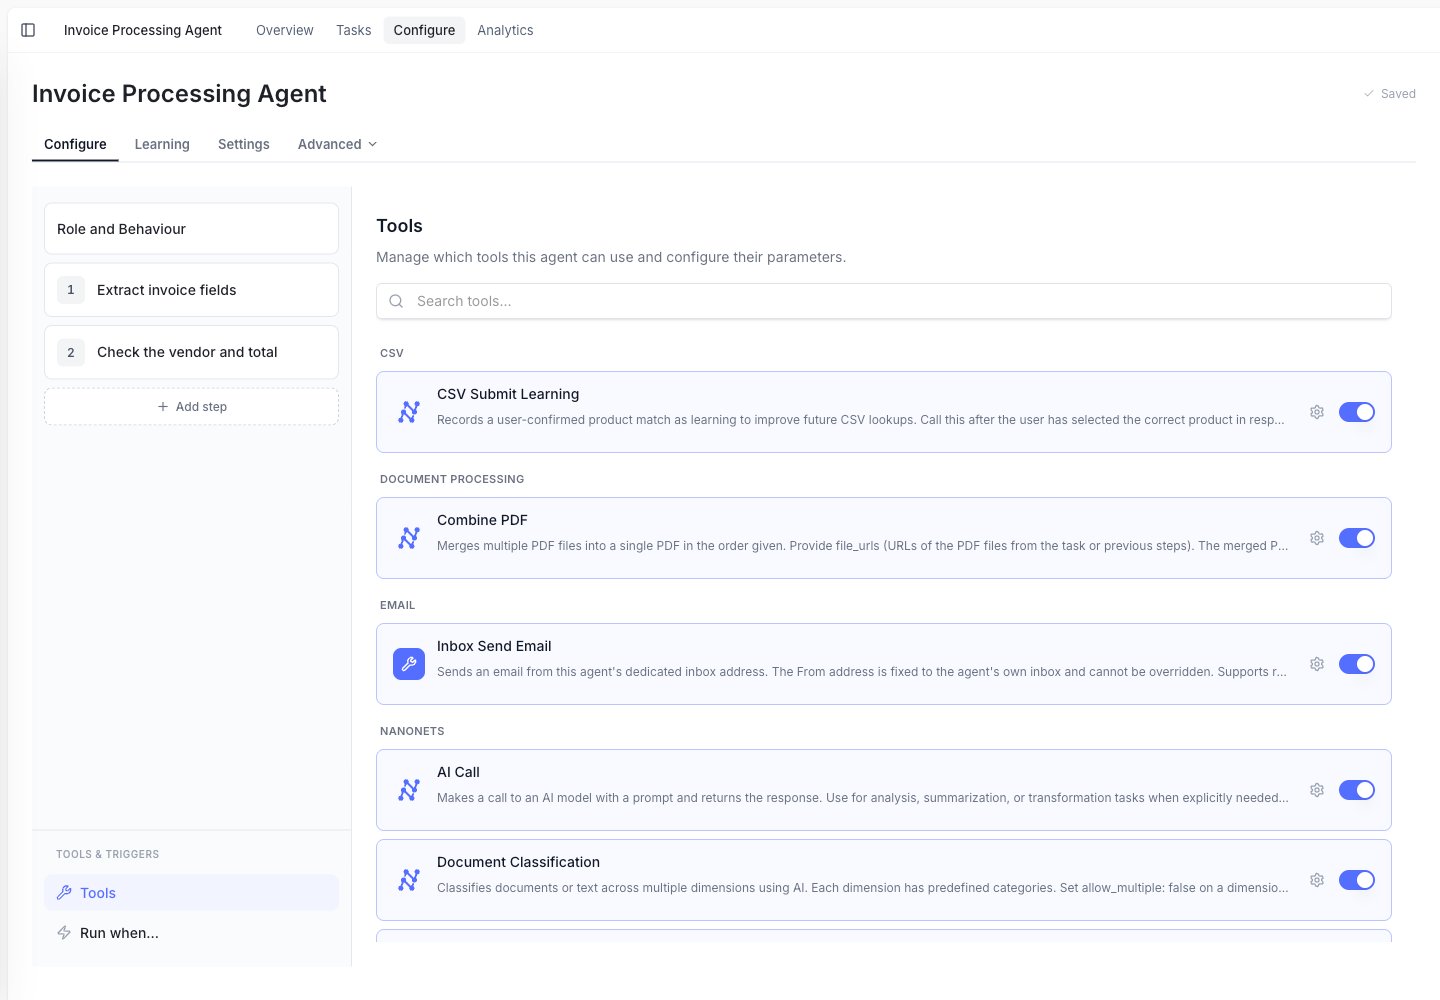
Tools are actions the agent can take.
For example, an agent can extract data from a PDF, look up a row in Google Sheets, create a file, send a Slack message, or ask a person a question.
Only add tools the agent needs for this job. More tools are not always better.
## Add tools
Tools are actions the agent can take.
For example, an agent can extract data from a PDF, look up a row in Google Sheets, create a file, send a Slack message, or ask a person a question.
Only add tools the agent needs for this job. More tools are not always better.
 ### Reference a tool in a step
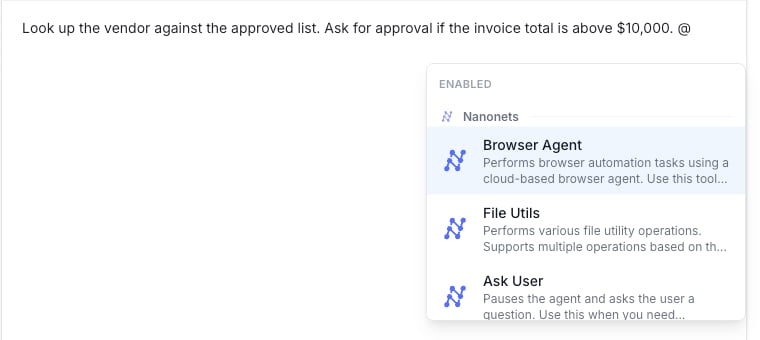
You can also point to a tool directly inside a step's instructions. Type **`@`** to bring up the tool menu, then pick the tool, and it's inserted as a label. This tells the agent exactly which tool to use at that point in the work.
### Reference a tool in a step
You can also point to a tool directly inside a step's instructions. Type **`@`** to bring up the tool menu, then pick the tool, and it's inserted as a label. This tells the agent exactly which tool to use at that point in the work.
 ## Choose when it should run
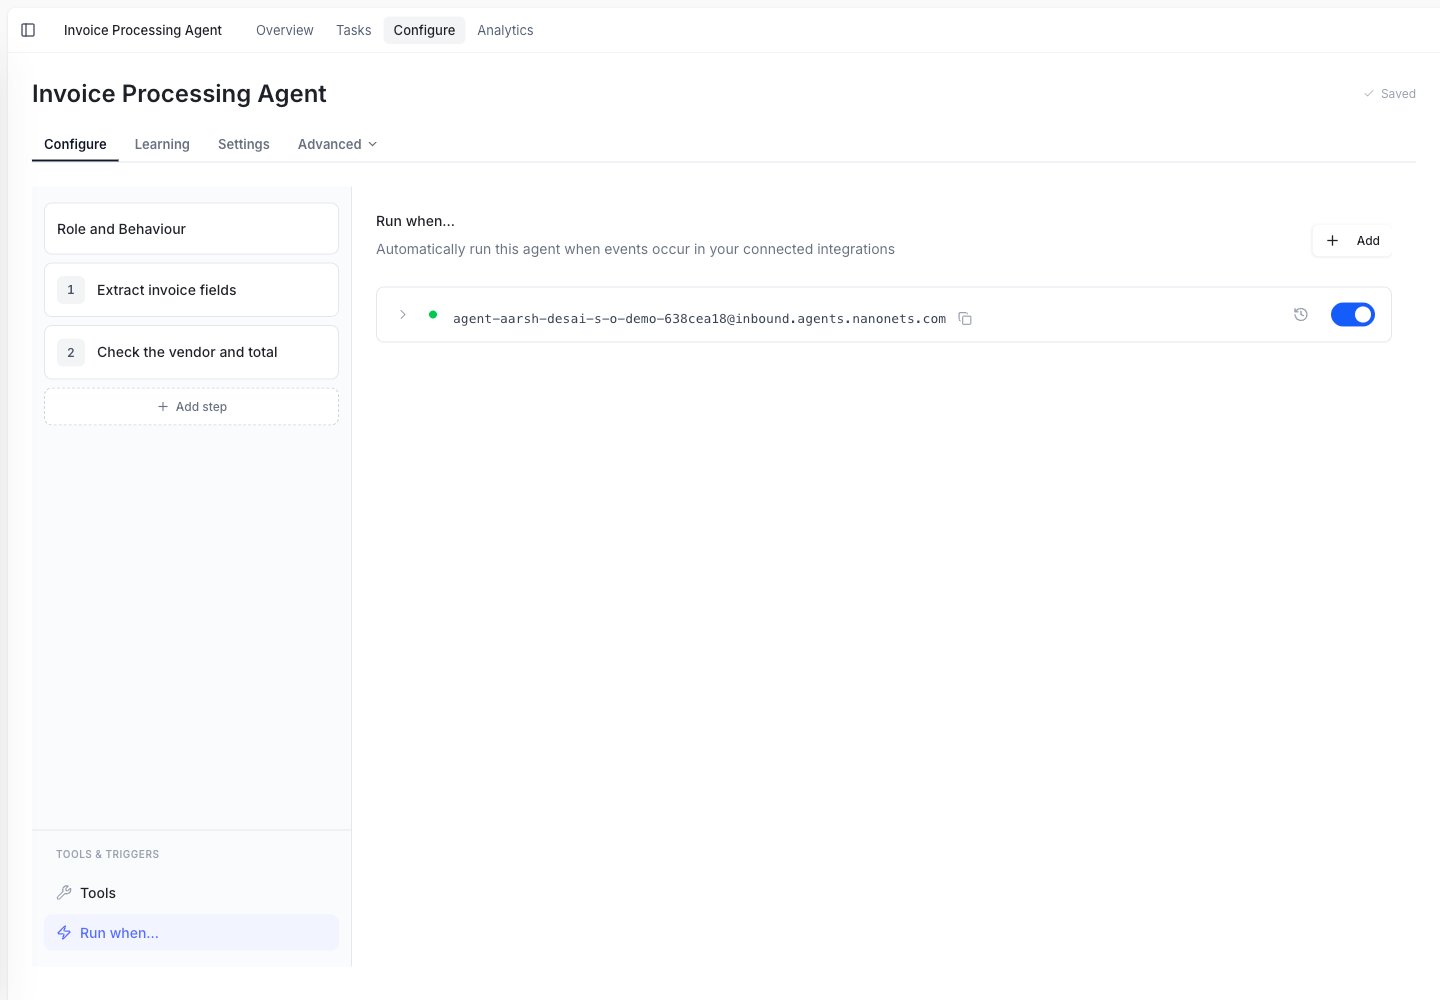
Open **Run when...** to start the agent automatically.
Common options include:
* When an email arrives.
* On a schedule.
* When another connected app sends an event.
* When a user starts a task by hand.
## Choose when it should run
Open **Run when...** to start the agent automatically.
Common options include:
* When an email arrives.
* On a schedule.
* When another connected app sends an event.
* When a user starts a task by hand.
 ## Write clear instructions
You guide an agent in three places: **Role and Behaviour** (how it should act on every task), **Steps** (the order of work), and **Rules** (the specifics it learns over time, covered in [Rules](/docs/guide/rules)). You don't need technical prompts. For Role and Behaviour and Steps, write plain business directions, the way you'd brief a new teammate.
A simple pattern:
Example: "Extract the invoice number, vendor name, invoice date, due date, line items, and total."
Example: "Do not guess missing values. Mark them as missing."
Example: "Ask the user if the total does not match the line items."
Example: "Add one row per invoice to the Invoice Review spreadsheet."
Keep instructions concrete:
| Avoid | Better |
| ----------------------------- | --------------------------------------------------------------------------------------- |
| "Process invoices correctly." | "Extract invoice number, vendor, date, total, and line items. Flag missing PO numbers." |
| "Check everything." | "Check that the invoice total matches the sum of line items." |
| "Be careful." | "Ask for approval before sending any email outside the company." |
## What goes in the prompt vs a rule
**Role and Behaviour and Steps** describe the agent's job: who it is and the core process it follows. Keep them focused on that.
Everything you add on top (preferences, corrections, guardrails, exceptions) is a **rule**. A rule is either:
* **Global**: applies to every task. Best for always-on guardrails, like "Ask for approval before any payment above \$10,000." Leave it unscoped so it applies everywhere.
* **Scoped**: applies only to a specific vendor, customer, or document type, using tag groups. Best for things like "For Northwind Traders invoices, the date is DD/MM/YYYY."
| Role and Behaviour / Steps | A rule (global or scoped) |
| ----------------------------------------------------- | ------------------------------------------------------------------ |
| Who the agent is and how it works | A preference or guardrail you want enforced |
| The core process and the order of work | An always-on rule (global) or a context-specific one (scoped) |
| "Read invoices and extract the key fields, in order." | "Ask for approval before any payment above \$10,000." (global) |
| "Check the vendor and the total before approving." | "For Northwind Traders invoices, the date is DD/MM/YYYY." (scoped) |
The test: **Role and Behaviour and Steps explain the task itself. Anything you'd refine or add over time is a rule, so keep it global if it always applies, or scope it to a tag group if it only applies sometimes.**
Don't try to write every exception into Role and Behaviour up front. A short, focused prompt plus a growing set of rules is easier to read, review, and improve.
Scoped rules use tag groups. See [Tag groups](/docs/guide/tag-groups) for those, and [Rules](/docs/guide/rules) for how rules are created and approved.
## Keep the first version simple
Your first agent does not need to handle every edge case.
Start with the normal path. Run a few tasks. Then add rules for exceptions, corrections, and special cases.
If the process has many decisions, write each decision as a separate step. This makes the agent easier to review and improve.
## Publish changes safely
Agent edits are saved to a draft first. When the draft is ready, publish it as a numbered version and choose when that version should run live tasks.
Learn more in [Agent version control](/docs/guide/agent-version-control).
## Write clear instructions
You guide an agent in three places: **Role and Behaviour** (how it should act on every task), **Steps** (the order of work), and **Rules** (the specifics it learns over time, covered in [Rules](/docs/guide/rules)). You don't need technical prompts. For Role and Behaviour and Steps, write plain business directions, the way you'd brief a new teammate.
A simple pattern:
Example: "Extract the invoice number, vendor name, invoice date, due date, line items, and total."
Example: "Do not guess missing values. Mark them as missing."
Example: "Ask the user if the total does not match the line items."
Example: "Add one row per invoice to the Invoice Review spreadsheet."
Keep instructions concrete:
| Avoid | Better |
| ----------------------------- | --------------------------------------------------------------------------------------- |
| "Process invoices correctly." | "Extract invoice number, vendor, date, total, and line items. Flag missing PO numbers." |
| "Check everything." | "Check that the invoice total matches the sum of line items." |
| "Be careful." | "Ask for approval before sending any email outside the company." |
## What goes in the prompt vs a rule
**Role and Behaviour and Steps** describe the agent's job: who it is and the core process it follows. Keep them focused on that.
Everything you add on top (preferences, corrections, guardrails, exceptions) is a **rule**. A rule is either:
* **Global**: applies to every task. Best for always-on guardrails, like "Ask for approval before any payment above \$10,000." Leave it unscoped so it applies everywhere.
* **Scoped**: applies only to a specific vendor, customer, or document type, using tag groups. Best for things like "For Northwind Traders invoices, the date is DD/MM/YYYY."
| Role and Behaviour / Steps | A rule (global or scoped) |
| ----------------------------------------------------- | ------------------------------------------------------------------ |
| Who the agent is and how it works | A preference or guardrail you want enforced |
| The core process and the order of work | An always-on rule (global) or a context-specific one (scoped) |
| "Read invoices and extract the key fields, in order." | "Ask for approval before any payment above \$10,000." (global) |
| "Check the vendor and the total before approving." | "For Northwind Traders invoices, the date is DD/MM/YYYY." (scoped) |
The test: **Role and Behaviour and Steps explain the task itself. Anything you'd refine or add over time is a rule, so keep it global if it always applies, or scope it to a tag group if it only applies sometimes.**
Don't try to write every exception into Role and Behaviour up front. A short, focused prompt plus a growing set of rules is easier to read, review, and improve.
Scoped rules use tag groups. See [Tag groups](/docs/guide/tag-groups) for those, and [Rules](/docs/guide/rules) for how rules are created and approved.
## Keep the first version simple
Your first agent does not need to handle every edge case.
Start with the normal path. Run a few tasks. Then add rules for exceptions, corrections, and special cases.
If the process has many decisions, write each decision as a separate step. This makes the agent easier to review and improve.
## Publish changes safely
Agent edits are saved to a draft first. When the draft is ready, publish it as a numbered version and choose when that version should run live tasks.
Learn more in [Agent version control](/docs/guide/agent-version-control).